QPin for Desktop Setup & User Guide: Connect iPhone, Lock Location, Plan Routes, and Export Data
A complete QPin for Desktop guide based on the desktop workflow overview: activation, USB connection, map preview, one-click location lock, route planning, multi-stop simulation, history, favorites, and GPX/KML/CSV export.
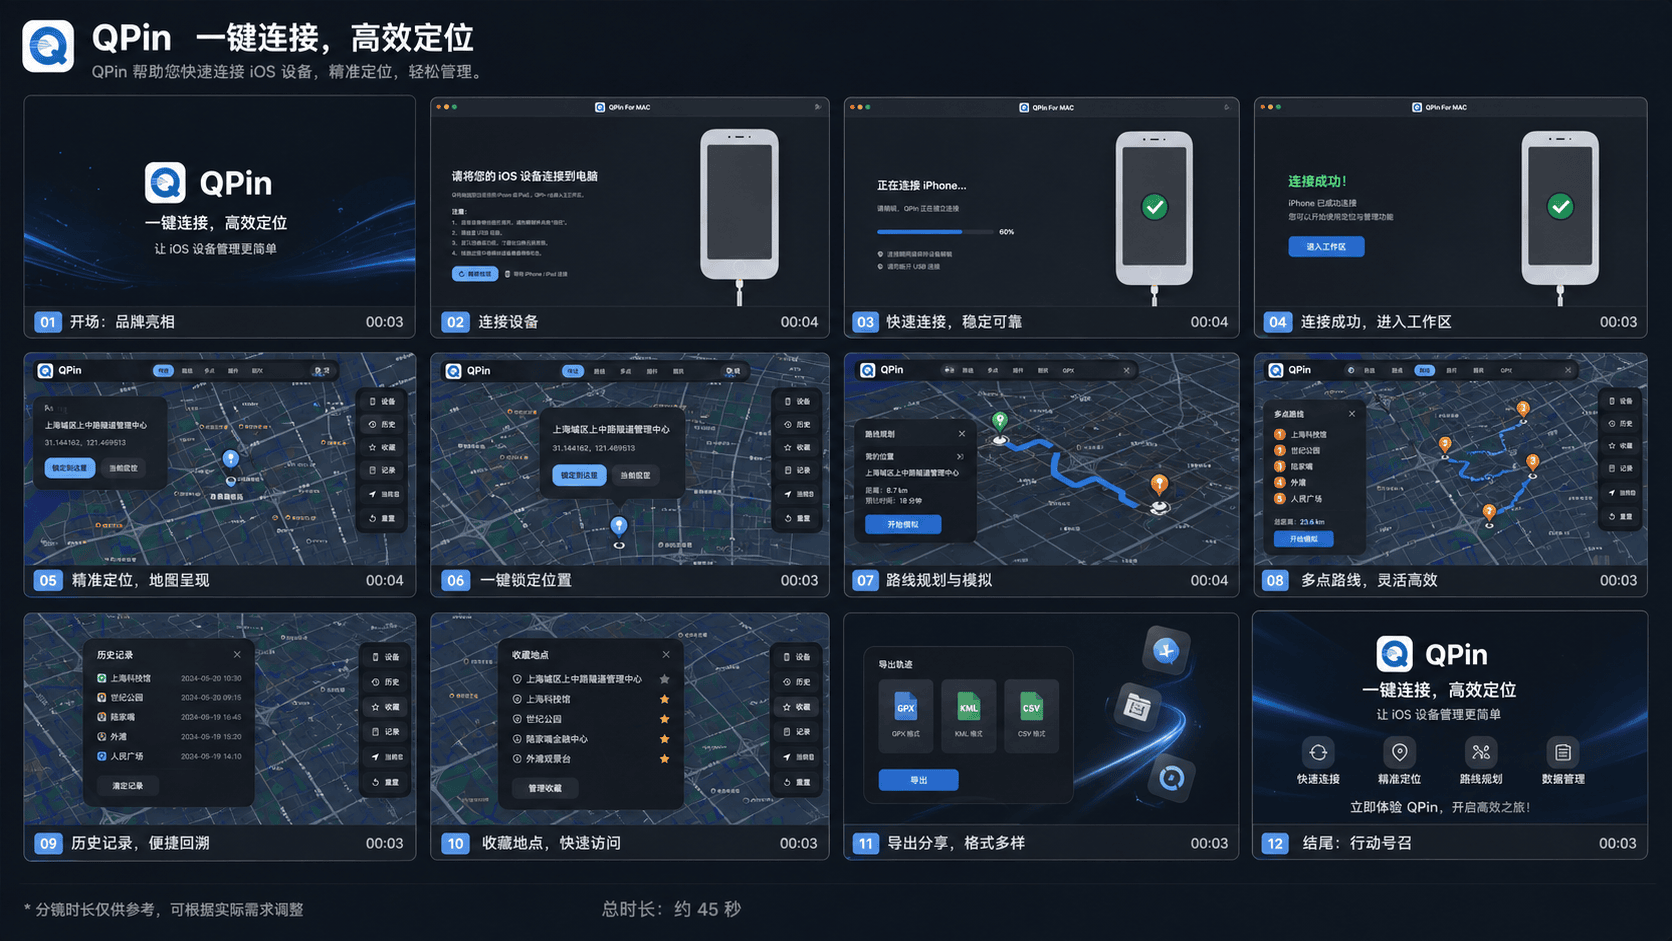
QPin for Desktop Setup & User Guide
This guide follows the desktop workflow shown in the overview image above. It is designed for QPin for Desktop users who want one clear reference for setup, location locking, route planning, favorites, history, and export.
Before you begin
- Install QPin for Desktop and enter your activation code first
- Use a stable USB data cable
- Keep the iPhone unlocked during connection
- On first use, complete the required trust prompt and Developer Mode setup
- The screenshot is based on the macOS interface; supported Windows builds follow the same workflow with small UI differences
Desktop workflow overview
- Launch the app and confirm the desktop environment is ready.
- Connect the iPhone by USB and wait for the connection screen to finish.
- After the success screen appears, enter the main workspace.
- Search for a city, address, or coordinate and preview it on the map.
- Use the one-click location lock to apply the selected point.
- Open route planning when you need continuous movement between points.
- Use multi-stop mode if you want a path that crosses several saved places in sequence.
- Check History to reopen recently used points or routes.
- Save common places into Favorites for faster access later.
- Open the export panel when you need GPX, KML, or CSV output.
- Verify the applied location in the destination iPhone app before starting a longer session.
- When you finish, disconnect the cable and restart the iPhone to restore real GPS.
How to use each main feature
Connect and enter workspace
The first four frames in the overview correspond to the startup flow: open the app, connect the iPhone, wait for the confirmation screen, and enter the workspace. If the app stays on the connection screen, check the USB cable, the trust prompt, and whether the phone remains unlocked.
Search, preview, and lock location
The map view is the core workspace. Search a place, confirm the pin on the map, and then apply the point. For first-time testing, start with one fixed point before moving to routes or more advanced movement tools.
Route planning and multi-stop simulation
Use route planning when you want continuous movement along one path. Use multi-stop mode when you need several stops in sequence. For a new route, start with a short path first and verify the target app updates as expected before extending the route.
History, favorites, and export
History is useful when you need to revisit the last locations quickly. Favorites are better for repeated use cases such as work zones, test points, or frequently used cities. Export is intended for route or point data management, with GPX, KML, and CSV formats shown in the overview.
Practical tips
- Keep the cable stable while a route is running
- Recheck the position inside the target app after large jumps
- Save often-used points to Favorites instead of searching every time
- Use short validation sessions before longer route simulations
- If the app label or layout differs slightly on Windows, follow the same sequence rather than matching every button visually
Summary
The core QPin for Desktop sequence is:
Activate -> Connect -> Enter workspace -> Search -> Lock point -> Plan route -> Check history/favorites -> Export if needed -> Disconnect and restart
FAQ
Is this guide only for macOS?
The workflow is written around the desktop interface shown in the screenshot. Supported Windows builds follow the same logic, although some button labels or layout details may differ slightly.
Do I need to keep the iPhone connected during use?
Yes. For the desktop workflow, keep the iPhone connected by a stable USB data cable while the software is actively controlling location or running a route.
Which export formats are supported?
The export screen in the desktop workflow supports GPX, KML, and CSV output for route or point data.
How do I restore the real location after using QPin for Desktop?
Disconnect the USB cable and restart the iPhone. After reboot, iOS will return to the real GPS location.